DWF-Flashback: Embracing My Hate

IMG_2097You know how the Facebook throws up memories from the past with annoying frequency? This blog post from a few years ago popped up today and made me laugh so I  figured you guys could use a chuckle too in the run-up weekend to the big feast next week.  Oh, and I’ll be posting my new holiday menu in a week or so, too.

In the meantime – For all you out there who hate the BS (you’ll figure it out….give it a minute), this one’s for you!


I know we are supposed to be filled with the loving warm fuzzies this time of year.  But I feel it’s time to admit that as soon as Halloween rolls past and “the holidays” come into view, I feel something else too. I feel hate. Shocking, but true. And I’m not the only one.

In the past I’ve tried to hide it. I’ve tried to ignore my loathing, to be open to at least considering the possibility of tolerating if not liking. But this year I’ve decided I’m done. I’m 53 and it’s high time I acknowledge and embrace, publicly. Step back, here goes:

I HATE BRUSSELS SPROUTS!  I can’t think of any food I hate more. Kale comes close, but the sprouts still win. Sure they’re kinda cute, like doll-sized toy cabbages. Cuteness can’t quell my hate fire. Neither does the fact that you can buy them all cozied up on brussels branches and flaunt your purchase through the farmer’s market like a vegetable drum majorette. I still hate them.

Why the need to post my sprout scorn for all the world to see? Because people don’t believe you when you tell them politely. Seriously. All you fellow haters out there try it and just see what happens. The minute your server gleefully announces “we finally have our brussels sprouts back on the menu for the season” and you reply, “thank you, no, I don’t care for them,” the dance starts. You’ll be told that their preparation is different. Countless sprout-haters have been converted with a mere bite, just trust them. Then they throw bacon, or duck fat, or cranberries into the mix. Maybe roast the suckers in high heat ovens, or braise them in bourbon, or countless other ploys to make you think that somehow the offending cruciferous veg would magically shrug off its foulness.

I know you sprout lovers have the best of intentions, but please, PLEASE believe me. I hate them. You could wrap them in hundred-dollar bills, bathe them in dark chocolate and bring out Clooney to serve them to me off his chest, and I would still refuse. THAT is how much I hate them. But hey, my hatred leaves more sprouts for you, right? So the next time you ask me to try them, telling me I only hate them because I haven’t tried yours, don’t. I love that you love them so I don’t have to, and will never question nor judge why. Just let me embrace my hate.

Not a chance a brussels sprouts recipe could darken my blogstep, but since Thanksgiving is right around the corner, here are a few gems to help your holidays:

If you like what you read here, please help me spread the word. Meantime, I’d love you to join me on Facebook (please click the ‘like’ button.)

Traditions, Chickens and Fancy Pants

In honor of chocolate bunnies, colored eggs, matzo brei, fancy pants, Oma, Mom and the joy of it all, some seasonal musings I first posted few years ago. 🙂


I’ve mentioned before that I don’t follow any specific religious dogma, unless you count no white before memorial day.  Rather, my dogma tends to be an amalgam of all of them, paying particular attention to the ones with food-related traditions. So at this time of Passover, Easter and the Vernal Equinox (lest we forget the Druids), I’m quite happy. I get to sample all sorts of wonderful fare, from matzo brei and gefilte fish (the former being a perfect vehicle for butter, the latter for horseradish), to wonderful Easter breads, eggs in every form, and fresh ingredients sprouting from the newly thawed ground. It’s a veritable new life and renewed hope buffet.

Food aside (for the moment), I do appreciate all the traditions celebrated this time of year. As a little girl up we did Easter, but the Sunday School litany held less interest for me than ceremonies involving jelly beans, chocolate bunnies, and playing hide and seek for eggs colored with PAAS dye. And my favorite holiday tradition involved getting a new dress from my grandmother and matching accessories (bag, gloves, hat and especially fancy shoes) from mom. No frills were spared, and it was not unusual to have ruffles on my dress, gloves, socks, and, of course, fancy pants.  What exactly are ‘fancy pants’? Dressy bloomers for little girls. Think underwear with rhumba-sleeve-sized ruffles. Fancy pants were worn under your dress but over your underwear, and, in my opinion, definitely meant to be admired by all. I loved my fancy pants, I mean really loved them, and found countless ways to show them off. Cartwheels worked pretty well, a subtle but effective option, but it wasn’t beyond me to hike up my pretty dress and say in a loud voice “look at my fancy pants”. Fashion is fashion after all.

My fancy pant obsession aside, of all the traditions of day the most beloved by my family was the knitted chicken. For us, it just wouldn’t be Easter without a flock of them. Let me explain. As part of our Easter baskets, my grandmother would give us plastic eggs filled with jelly beans, chocolate eggs and the like. However, decorum being what it was, these eggs could never be presented naked. They required dressing, and their vestments took the form of a knitted chicken sitting on top. Usually white or yellow with a red comb, googly eyes and a jaunty pink ribbon around wooly neck, knitted chickens lined up down the middle of the table, smugly guarding their plastic eggs filled with sugary bounty. As we grew older and into obnoxious adolescence, we’d make fun of these poultry egg-cozies, but they had better be on that Easter table.

The flock has scattered in the subsequent years, but I’m betting if you visited my brother or mother on Sunday, pieces of the knitted chicken nativity would be on display, regardless of whether the grown kids were around. After all, that chocolate bunny needs guarding. 😉

Eggs play a part in all of the holidays this time of year, which seems logical since life, hope and rebirth are central themes. Since they are one of my favorite foods, eggs feature in my recipe too.  When I was a kid one of the best treats my mom made for dessert was my grandmother’s baked custard. Similar to flan or crème brulee but far less fussy, there are few desserts more comforting.  I’ve decided to take Oma’s basic recipe and liven it up a bit with a little orange in the form of zest and a splash of Cointreau. My Baked Orange Custard would make a great dessert (or breakfast) on any holiday table this season. Baked Orange Custard

Makes eight 1/2-cup servings

  • 3 cups milk (whole is best, 2% works too)
  • 4 eggs, beaten
  • 1 cup sugar
  • ¾ tsp salt
  • 1 tsp vanilla
  • 2 tsps Cointreau or Grand Marnier
  • ½ tsp orange zest

Preheat oven to 500°F. Put eight ½ cup ramekins or glass custard cups into a roasting pan or large lasagna pan. Fill the pan up with warm water to about ½ way up the cups, creating a water bath. Whisk together eggs, sugar, salt, liqueur and zest and set aside. Heat the milk in a saucepan to scalding (just before it boils and there are little bubbles around the sides of the pan.) Take the milk off heat. While whisking egg mixture, add in about 1/3 cup of the hot milk and whisk well. You are bringing the temperature of the eggs up or tempering the eggs (so that you have a smooth mixture and not sweet scrambled eggs.) Now add the rest of the milk and whisk thoroughly. Skim off about a tablespoon of the foam and put into each cup, then carefully fill the cups with ½ cup of the custard mixture. Bake the custards in the oven for 10 minutes or until just set and the tops have browned a little. If they are browning too quickly, just loosely cover pan with foil. If they are not set by 10 minutes, turn oven off and leave the custard in a few minutes more until they set. Carefully remove the custards from the water and let cool a little. These are wonderful warm, but are also swell at room temperature. If you are not serving right away, let cool to room temp then cover with cling film and store in the fridge. Let them come to room temperature before serving. Calories: approximately 220 per ½ cup serving.

If you like what you read here, please help me spread the word. Meantime, I’d love you to join me on Facebook (please click the ‘like’ button), or my Instagram page. Thanks! 🙂

Bubble Wrap

This is a true story. The names haven’t been changed because who am I kidding, you know it’s about me.

File May 28, 5 57 00 AMIn about three weeks I’ll be moving to Salt Lake City. That in and of itself is kind of exciting — moving to a great city, closer to people I’m close to, and (fingers crossed) the possibility of a really cool life on many levels. Yet with all that potential for awesome comes a bit (plus a bit more) of uncertainty. And that “bit” felt more like a giant load a few weeks ago. Which lead to the pounding stress monster that took up residence in my brain and a few other organs.

The thing about a Stressinator, (think cyborg like Schwarzenegger with the constant nasal whine of Woody Allen), is it has a tendency to nudge you awake at 3AM. Which it did. A barrage of “what if’s” and “oh god’s” ran through my head like the ceaseless news crawl on  CNN. Then a brief and quite pragmatic moment of clarity ran across my mental screen: I need to buy packing tape. So I did, hit send, closed the iPad, closed the eyes, and sleep took over again.

Like many of you, my tablet sleeps next to me on the nightstand. Once consciousness claims me in the morning, it and my readers are the start of my day.  More often than not it’s the “ping” of email that wakes me in the first place, and it did just that the morning after my Stressinator visit. It was an email from the elves at amazon, bringing glad tidings of packing tape in my future. Suddenly I felt better. One piece of the chaos was put into place, and with that ping the monster was vanquished for a little while. Ok, so it’s quite possibly a symptom of insanity that a delivery of office products makes me feel better, but it did, and these days I’ll take whatever I can get.

I relayed this whole thing to my mom in that week’s phone call, we had a good giggle, and life went on its way. Until the UPS man came by a few days later. Not unusual, since I order a lot of things online ever since I moved to a rural small town with closest city 65 miles away. The size of the box was what had me perplexed. It was enormous, and unless I had been sleep-ordering coffee tables, definitely wasn’t mine. “Yup, it’s addressed to you” said UPSMan. “Don’t worry, it’s really light.”

Inside the box was possibly the best defense against the monsters of uncertainty, doubt, and fear of leaping off cliffs…a GIANT roll of bubble wrap. I burst into giggles, then tears, then snorting laughter. Then I called mom. “Did you sent me an enormous roll of bubble wrap?” “Yup”, said she. “I figured if packing tape made you feel better for a morning, this would do the trick for a week!” And it still does, every time I look at it. I even hug it every once in a while. 🙂 ❤

File May 28, 5 55 12 AM

How do you follow that with a recipe? With homemade Balsamic Glaze, that’s how. It bubbles, it makes you feel better. You need more reason than that?

This stuff is magical, and stinkin’ easy. Just a bottle of balsamic vinegar (16oz.), half a cup of sugar, and a good pinch of salt, and grind or two of black pepper. Use it over strawberries, ice cream, pizza, salad, drizzled on some pecorino or aged parm, or just really good olive oil and crusty bread.

Balsamic Glaze

  • 1 16.9 oz bottle of good balsamic vinegar (you don’t have to buy the expensive aged ones for this, just use one you like the taste of.)
  • 1/2 cup sugar
  • pinch salt
  • a few grinds black pepper

One very important thing to note about making your own balsamic glaze is boiling vinegar is a pretty pungent undertaking. Definitely an open window/exhaust fan thing. And don’t stand right over the pot. It’s not scary, just be a little cautious. Some of you may even have to leave the house while a loving volunteer whips some up for you.

Mix all the ingredients together in a medium saucepan. Bring to a boil, lower to a simmer and cook until it becomes syrupy, or until the volume is about half of what you started. Store in a clean jar or bottle in the fridge, it will keep for a pretty long time. If it gets too thick, just dilute a little with water, or some good aged balsamic vinegar.

Strawberry Bruschetta

I love making this for Memorial Day weekend, because it’s about that time of year the first strawberries show up at the farmers market.

Clean and chop a pint of strawberries and toss into a bowl. Add a pinch of salt, a grind or two of black pepper, and a teaspoon fresh thyme leaves or 1/4 cup chopped basil. Add in two teaspoons balsamic glaze, 1 teaspoon good olive oil, toss and let sit for about 15-20 minutes.

Toast up some baguette slices or grill slices of a good crusty country loaf. Top with the strawberry mixture and enjoy!

If you like what you read here, please help me spread the word. Meantime, I’d love you to join me on Facebook (please click the ‘like’ button). You can also see what’s cookin’ on my Instagram page. Thanks!  :-)

Oh, It’ll Fit…

2015-12-06 16.17.36-1

I have a few talents. The more obvious ones you know about or you wouldn’t be here in the first place. Here’s one not so obvious: I’m a fitting things in small spaces savant. Seriously. Give me a suitcase, a tiny apartment freezer, a dresser drawer and I can clown car that sucker to fit the contents of a shipping container. This talent comes in particularly handy this time of year. You know those boxes from the post office where you pay a reasonable flat rate for 2-day delivery, providing it fits in the box? Those cardboard vessels are my santa’s sleigh. And when they say “if it fits, it ships”, rest assured “it” WILL fit.

I’m not entirely certain where or when my skill of cramming a lot into a little evolved. Perhaps with my first pair of Jordache jeans. You remember Jordache, right? It didn’t matter how thin you were (or weren’t), somehow a pair of Jordache always involved sucking it in and lying on a flat surface while hoisting the zipper. Maybe my talent of turning a small/medium/large cardboard box into Mary Poppin’s magic bag surfaced with my first studio apartment, back when “tiny housing” was because you were poor, not hip. I don’t really care, I’m just glad I’ve got it. So are those naughty yet nice recipients once the cardboard clown car pulls into their mailbox.

Here’s a few last minute goodies to cram into your own tiny boxes, or better yet, into your mouth. Wishing you the merriest of merry from the Cooking in My Heels kitchen!!

dsc06139  photo 2 DSC05943

If you like what you read here, please help me spread the word. Meantime, I’d love you to join me on Facebook (please click the ‘like’ button), and check out what else is going on in my kitchen at cookinginmyheels.com. Thanks!  🙂


Embracing My Hate

FullSizeRender - Version 2I know we are supposed to be filled with the loving warm fuzzies this time of year.  But I feel it’s time to admit that as soon as Halloween rolls past and “the holidays” come into view, I feel something else too. I feel hate. Shocking, but true. And I’m not the only one.

In the past I’ve tried to hide it. I’ve tried to ignore my loathing, to be open to at least considering the possibility of tolerating if not liking. But this year I’ve decided I’m done. I’m 53 and it’s high time I acknowledge and embrace, publicly. Step back, here goes:

I HATE BRUSSELS SPROUTS!  I can’t think of any food I hate more. Kale comes close, but the sprouts still win. Sure they’re kinda cute, like doll-sized toy cabbages. Cuteness can’t quell my hate fire. Neither does the fact that you can buy them all cozied up on brussels branches and flaunt your purchase through the farmer’s market like a vegetable drum majorette. I still hate them.

Why the need to post my sprout scorn for all the world to see? Because people don’t believe you when you tell them politely. Seriously. All you fellow haters out there try it and just see what happens. The minute your server gleefully announces “we finally have our brussels sprouts back on the menu for the season” and you reply, “thank you, no, I don’t care for them,” the dance starts. You’ll be told that their preparation is different. Countless sprout-haters have been converted with a mere bite, just trust them. Then they throw bacon, or duck fat, or cranberries into the mix. Maybe roast the suckers in high heat ovens, or braise them in bourbon, or countless other ploys to make you think that somehow the offending cruciferous veg would magically shrug off its foulness.

I know you sprout lovers have the best of intentions, but please, PLEASE believe me. I hate them. You could wrap them in hundred-dollar bills, bathe them in dark chocolate and bring out Clooney to serve them to me off his chest, and I would still refuse. THAT is how much I hate them. But hey, my hatred leaves more sprouts for you, right? So the next time you ask me to try them, telling me I only hate them because I haven’t tried yours, don’t. I love that you love them so I don’t have to, and will never question nor judge why. Just let me embrace my hate.

DSC07624

Not a chance a brussels sprouts recipe could darken my blogstep, but since Thanksgiving is right around the corner, here are a few gems to help your holidays:

If you like what you read here, please help me spread the word. Meantime, I’d love you to join me on Facebook (please click the ‘like’ button.)

Efficiency

I like to think of it as being efficient. I’m the gal with a bag slung over shoulder, laptop case dangling on wrist, gripping three grocery bags in one hand while the other hand is balancing a full cup of lava-hot coffee and simultaneously turning key in lock, shoving my knee into the ajar door, flinging it open (one-legged), and bolting inside before it slams shut. Efficient, right? Lazy would be another description. Too lazy to be bothered with making two trips from the car, thus avoiding the high probability of flipping cup and contents and the resulting 2nd degree scorching as I watch my airborne laptop hit the pavement. Today however, my early morning episode of “Beat the Clock” was successful.

Efficiency, as defined in the dictionary in my brain doesn’t necessarily mean the best, most effective, or even fastest way to do something well. It’s more like how many layers I can cram into one action and still end up with the result I was aiming for. Well, close to aiming for, kinda… If you’ve been reading my blog for a while, this should not surprise you. Why do I bring this up? The other day I baked what I think is the culinary equivalent of efficiency. Or maybe it was just the most efficient delivery system of ‘HOLY CRAP THAT’S GOOD’ food, ever. A teeny bit overstatement perhaps, but MAN this package of tasty wrapped in pastry was good, quite effectively delivered a remarkable number of favorite food groups in one slice, feeds an army and keeps belly full and happy for a very long time. Surely food efficiency defined.

I discovered Torta Pasqualina about 20 years ago when I was working as a temp for a family of HVAC contractors. The job was just a job, something to pay the bills while trying to find the next step in my somewhat winding career path. But the people, and more importantly, the people watching was probably the most fun I’ve ever had in an office setting. Everyone was related, I mean everyone. If you weren’t in some degree born into the family you were married into it. Which made for pretty interesting overheard conversation, especially if you were the only unrelated one in the office. The good news was despite my lack of genetic or marital affiliation, I was still treated like family. Even better, I was fed like family too. This clan was old-school Italian with a fully equipped kitchen in the back of the building, and a fully equipped mama cooking in it daily. Since I was (between the hours of 9-5) family, I had a hot lunch every day. And if I remembered to bring some empty containers with me, I went home with dinner too, a bona-fide member on the family meal plan!  Which brings me back to the torta.

While I only worked there for a few months, those months fell over Easter, one of the BEST holidays to be Italian. As the holiday grew closer I started to hear about this thing called ‘Torta Pasqualina’. I asked what that meant and was told it was Easter pie. Pie? I LOVE pie! I still had no idea what was in it, but knew based upon all the hubbub surrounding its arrival, I wanted it badly. A few days later I got my chance. A “test torta” was brought in for lunch and I was invited to sample. The “pie” was made in a springform so taller than I had imagined, filled with layers of good stuff inside, and weighing what seemed about 10 pounds. I’m not kidding, I was asked to carry it in from the car. The crust was made up of layers of olive-oil based pastry dough and inside was a base of sautéed chard and buttery onions, followed by a layer of ricotta mixed with ample parmesan and a few beaten eggs. Then, imbedded in the layer of cheese,  perfectly hard-cooked golden egg yolks, followed by a bit more parmesan and topped by another few layers of pastry. A fully encased meal in one efficient package. My ample slice kept me full for lunch and dinner, and the leftovers became breakfast the next day. In other words, Torta Pasqualina was good hot, warm, or even cold!

2015-04-04 19.26.58I considered making one myself that year, but when I looked at the recipe mama gave me, it seemed WAY too complicated. So it became just another fond food memory. That is, until I saw a recipe a few weeks ago. Now a bit older (ok, more than a bit), and definitely culinarily wiser, I figured why not! If every family that ever made one had their own variation, I  could too, and still cram in every ounce of the goodness of the original. So here is it – my version of Torta Pasqualina. Based upon the reaction of the eager mouths I served, it was efficient, and delicious!

Torta Pasqualina (adapted from many Nonna and non-Nonna sources, including Food52 and Epicurious)

Makes One 10 or 12″ springform-sized torta, which can feed a small army or large family (and a friend)

Recipe Notes:  When I started to research this recipe, I discovered that some of the more traditional versions called for using 31 layers of pastry, one for each year of Jesus’ life. I also found many that stated this interesting fact, and then said, “but I only make 4 layers”. See…efficiency.  I took it a step further. I decided since I was already making pie dough for my weekly bake for clients, I may as well make some more and use that. And it worked out very well. You could also use bought all-butter puff pastry, or phyllo. It’s a great recipe to make any time of the year, and the perfect bring-along for picnics since it feeds a ton and can be eaten hot, room temperature, or even cold.

Ingredients

  • 2 recipes pate brisee, or two all-butter pie crusts (**you could also use puff pastry or phyllo dough. If you use phyllo, use about 4 sheets on bottom and top, brushing each layer with olive oil before placing the next on top.)
  • 500 grams or a pound of baby spinach/kale/chard mix (3-4 bags – you can get these in the salad section of the market, or just use spinach or chard.)
  • A generous 1/2 cup caramelized onions (about a cup to cup and a half raw chopped onions, cooked in olive oil over medium low heat until they are golden.)
  • 1/3 cup golden raisins
  • 2-3 TBSP toasted pine nuts
  • 8 eggs
  • 1 cup grated parmesan
  • 1 1/2 cups whole milk ricotta
  • Salt & pepper
  • A pinch of nutmeg
  • 1/2 tsp dried marjoram

Preheat oven to 350ºF.

Prepare the greens layer:

Steam the greens with a tablespoon or two of water, good pinch of salt, a few grinds black pepper and the marjoram in a covered pan until tender – about 5 minutes. Drain off the water, let cool slightly, then put the greens on several layers of paper towels, roll up and squeeze to remove as much water as possible (too much liquid will create a soggy base). Finely chop the greens, add to a bowl with the 1/2 cup caramelized onions. Mix well, taste and adjust salt and pepper. Add in the raisins, pine nuts, and a third of the parmesan and set aside to cool completely.

 Prepare the ricotta layer:

In a separate bowl, combine the ricotta, 2 beaten eggs, a third of the Parmesan, pinch nutmeg, and season with salt and pepper. Beat until combined. Set aside in the fridge until needed.

2015-04-04 17.45.27To assemble the torta:

Spray or brush the inside of the springform with olive oil. Roll out one sheet of dough so it is large enough to line the springform bottom and sides with a little more than an inch overhang.

Fill the pie base with the greens mixture, smoothing over the top with the back of a spoon. Next, layer over the ricotta 2015-04-04 17.47.03mixture and smooth into an even layer. Using the back of a spoon, make 6 round indents over the surface of the ricotta that are big enough to fit an egg yolk in each. Crack an egg over a bowl to separate the white, leaving yolk. Carefully place the yolk in one of the indents in the ricotta. Repeat until all of the divots are filled. Whisk the whites together with a fork and pour just enough of the whites to make an even layer that just covers the ricotta. Sprinkle over the rest of the Parmesan.

Roll out the top crust  so it is about an inch larger than the top of the pan. Gently lay it over the top of the pie. Trim any overhanging bottom dough so it is about the size of the top, then roll the bottom and top dough together so you have a 1/2″ rolled crust around the inside of the pan. Using your left thumb (or right thumb if you are left-handed), tuck it between the edge of pan and rolled crust. Using your other hand, gently pinch the rolled crust around your thumb to make a scalloped edge and seal the crust around the pie. If you have leftover trimmings, roll out and make leaves, branches, whatever makes you happy. Think of it as edible playdough. Use a little of the leftover egg white to paste the decorations to the top of the crust.2015-04-04 18.04.24

Brush the top with olive oil and sprinkle with a tiny bit of salt (I like to use flake salt like Maldon for this), and place the pan on a parchment-lined backing sheet. This will make it easier to move in and out of oven and catch anything if torta bottom seeps a little (it might, mine did, but I just kept baking.)

Bake for about an hour to 1 1/2 hours or until the top is a nice golden brown.  Remove the pie from the oven and let stand for 15 to 20 minutes before removing the tin and cutting into it. If once you remove the sides of the pan the sides bow out a little don’t worry – they will firm up as it cools. I made this the evening before I served it, so it was room temperature when cut into and all the flavors had a chance to get to know each other a bit. Delizioso! 🙂

If you like what you read here, please help me spread the word. Meantime, I’d love you to join me on Facebook (please click the ‘like’ button), and check out what else is going on in my kitchen at cookinginmyheels.com. Thanks!  
A Season of Miracles

DSC05878Eight nights of light with oil for only one, a birth that changed the world, a jolly 5’x5′ man fitting down a 2’x2′ chimney. This time of the year is thick with miracles.

I happen to believe in miracles. No, really. Feh you say? It’s not possible that an occasionally jaded ex-city gal who doles out recipes with an extra helping of snark could possibly believe in events that could only be taken on faith? Yup, I do. Of course, you and I might have different definitions on what defines miraculous.

My view of magical happenstance is fairly modest. Messianic messages, angelic interference, or deity drama are all well and good, but in my mind, if the cake rises, the mayonnaise doesn’t break, and the rough puff puffs, HALLELUJAH! No matter how much I do it, I’m still impressed when the good stuff that goes in the pan comes out better. Despite cooking and baking since my hands could reach the counter, coming up with something, especially something out of nothing (or practically so) is a freakin miracle to my brain.

Pulling off the culinary miracle has definitely become easier in the digital, internet, every thought posted world. Pick your favorite search engine, enter in a few key words, and POOF! A ridiculous number of potential miracles. But my favorite culinary prestidigitation is still the least high tech, the most basic. Pan gravy. Seriously. Some chefs use the omelet scale to determine kitchen skill, but I use gravy. Gravy by definition IS pure magic. Take what many would consider the schmutz to be scrubbed from the bottom of a pan, add liquid of choice, reduce a bit, add in something luscious at the end, and you’ve pretty much got it. A miracle from schmutz, booze, broth and fat.

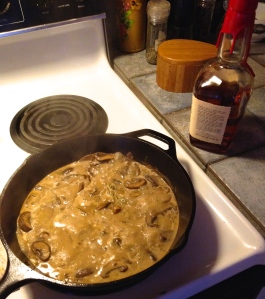
With the concurrent holidays of Hanukkah and Christmas upon us, it’s pretty much gravy season. So here’s a miracle in a pan to sauce your roast, latkes, or eat right from the skillet with a good baguette (I don’t judge) – Whiskey Cream Gravy.

2014-12-21 15.28.40

I actually started this gravy with sautéed cremini mushrooms. That’s what made the schmutz in the pan, since I was serving it over a sliced grilled sirloin. If you have a roast that you’ve browned off first in the pan, or a steak that you’ve seared, even better.

Whiskey Cream Gravy

  • 1/2 lb cremini mushrooms, sliced
  • 2 TBSP butter
  • 1 TBSP olive oil
  • 1 large or two small shallots, chopped
  • 1 cup low sodium beef broth
  • 3 TBSP bourbon
  • 2-3 TBSP heavy cream
  • 1 TBSP butter
  • Salt and pepper to taste

2014-12-21 12.59.21Melt the butter and olive oil in a skillet. Add the mushrooms and shallots, a pinch of salt and 1/2 pinch pepper (about 1/4 tsp salt, 1/8 tsp pepper). Saute over medium heat until the mushrooms have given up all their liquid and are starting to brown. When the mushrooms are dry, remove from heat and add the bourbon, scraping up any bits on the pan. Return to heat, add the broth and bring to a boil. Continue boiling until the liquid has reduced by about 1/3rd. Add cream and stir until incorporated. Taste and adjust for salt and pepper. Just before serving, add butter and stir until melted. Serve over sliced steak, prime rib, or the best baked potato you’ve had in a while!

If you like what you read here, please help me spread the word. Meantime, I’d love you to join me on Facebook (please click the ‘like’ button), and check out what else is going on in my kitchen at cookinginmyheels.com. Thanks!  🙂

It’s a springform….it’s a spatula….IT’S SUPERBAKER!!!

DSC04508

A superhero needs appropriate foot ware

I think in some strange parallel universe, I’ve become a superhero. Well, maybe not exactly a superhero. Whatever is sub of that. A semi-superhero? A demi-hero? Whatever it’s called, several times in the past month, good friends in mild to elevated degrees of culinary distress have summoned me to help save the day. Surely that’s the definition of hero, right? No, there wasn’t a giant rolling pin symbol projected into the night sky, nor red “bundt-phone” with a direct line to my oven. And other than a dishtowel thrown over my shoulder, I was cape less. But if a good friend calls with a houseful of guests in 4 hours and no dessert, or “Kaaa-rin” is called with mild urgency from the kitchen, SUPERBAKER springs into action.

When I’m invited to friends for dinner I’m not exactly planning on cooking.  But when it’s what you do, and everybody knows it, there’s no avoiding it.  I supposed it’s no different from being a plumber and asked to opine on a host’s leaky faucet. And my friends know as long as I’ve already been handed my glass of wine or cocktail, I’m happy to jump in when the need arises. After all, who doesn’t want to be a hero, and as one of the people eating, I’ve a vested interest in a tasty outcome.

Sure the cape of culinary superhero is a lofty mantle, but it’s one I was born to bear. My mother can make the best pan gravy you’ve ever had pretty much out of thin air. My brother can create delicious geographical phenomena and related topography from meatloaf. My dad could make a killer Sunday breakfast and clean out the refrigerator simultaneously. And of course, my grandmother was the Wonder Woman of potato salad. So if you need someone to run faster than a weeping meringue, leap tall souffles, or whip stiff egg whites with a single hand, look no further. It’s a springform….it’s a  spatula…IT’S SUPERBAKER!!!

  2014-08-04 13.52.24 2014-10-16 09.08.48

A few weeks ago, I was called into action when a dear friend needed a dessert for a Rosh Hashanah dinner she was hosting.  I immediately knew what I would make – an apple honey cake a friend had sent me from a favorite blog. But, it being fall in the land of orchards, my hostess in distress was tired of apples and pears, so my honey cake had to be free of both. Fear not kids! With SuperBaker on the job, the day would be saved! (Cue the dramatic music….)

Anyway, after a cup of coffee’s worth of time on the internet I found an intriguing version of the traditional holiday cake. It included a good hit of spice, some late season plums, and with a good glass of red wine in the mix too, how could it possibly be anything but wonderful. So here it is, courtesy of the New York Times and one of my culinary heroes, Melissa Clark.

Red Wine Honey Cake With Plums (Melissa Clark, NYT, 8/23/13)

Makes 10-12 servings

NOTE:  I didn’t make the plums as Clark describes in her original recipe. Instead I took about 2 cups of Damson plums, a few tablespoons of sugar (amount depends on the ripeness of the plums), a teaspoon of cinnamon, and a little pinch of cloves, and cooked it all over medium heat until the plums broke down and juices thickened a little. Serve the plum compote alongside the cake.

  • Grease or nonstick spray, for the pan
  • 300 grams all-purpose flour (2 1/2 cups), more for the pan
  • 10 grams baking powder (2 teaspoons)
  • 3 grams baking soda (1/2 teaspoon) 3 grams salt (1/2 teaspoon)
  • 2 grams cinnamon (1 1/2 teaspoons) 2 grams cardamom (1 teaspoon)
  • 2 grams ground ginger (1 teaspoon) 3 large eggs
  • 200 grams granulated sugar (1 cup) 1 1⁄4 cups olive oil
  • 1 cup plus 2 tablespoons good quality honey, more to taste
  • 3⁄4 cup dry red wine
  • Plum compote to serve along with the cake (see NOTE above)

Place a rack in the middle of the oven; heat to 350 degrees. Generously grease and flour a 10-inch Bundt pan, including center tube.

In a large bowl, whisk together flour, baking powder, baking soda, salt and spices. In another large bowl, whisk eggs well. Whisk in sugar, oil, 1 cup honey, the wine and the fresh ginger until well combined. Whisk in dry ingredients until smooth. (Ok, at this point you will likely get a little alarmed at the color of the batter. Yes, it’s sort of, well, armadillo grey. Don’t worry. I promise it will be gorgeous golden brown when it comes out of the oven. Trust me.)

Pour batter into pan and bake until springy to the touch and a cake tester comes out clean, 45 to 50 minutes. Transfer pan to a wire rack to cool for about 20 minutes, then unmold the cake and let cool completely.

Recipe note: Measurements for dry ingredients are given by weight for greater accuracy. The equivalent measurements by volume are approximate.

If you like what you read here, please help me spread the word. Meantime, I’d love you to join me on Facebook (please click the ‘like’ button), and check out what else is going on in my kitchen at cookinginmyheels.com. Thanks!  🙂

The Last Pageant

DSC04185I was never destined to wear a sash and crown, and have lived most of my life comfortably with that knowledge. I came to this realization early in life, imprinted through a series of failed attempts to sit on a float and perfect my beauty queen wave. No, significant therapy dollars were not spent to help me overcome the trauma of this. Just one irrefutable fact. I simply did not fit the dress. Let me explain…

When I was a kid, every late summer/early fall, my family would go to a local biergarten park for a weekend of brew, brat, and oompah-fueled bacchanal known as Volksfest. Each year the festivities included a pageant of sorts, wherein that year’s Steuben Parade queen and her court of adorable mini princesses would be crowned. Until I came to my pageant epiphany, each year my hopes up would rise at the thought that one of those taffeta wrapped princesses would be me. Imagine a stage filled with a stream of little girls sashaying past a group of judges while some jaunty german ditty played. And there I was among them, ready to take my place on the throne. Then, as judge fingers pointed to the fortunate few, the rest of us would be handed a Kennedy half-dollar and shown the steps leading off stage.

Truth be told, I had two things going against me and my shot at a ride along Fifth Avenue  atop a crepe paper float. The most obvious was that my grandmother was one of the pageant judges, which upon my victory could open me up to ethical allegations that could haunt my Fifth Avenue float ride. But at 8 or 9 years old, that thought never entered my mind, nor prevented me from smiling my cutest smile, curtseying like a little Von Trapp, and batting my baby blues judge-ward. Yet despite stinkin’ cuteness, every year my Kennedy was dropped in my palm, and off the stage I’d go. Obviously there was another reason (not for nothing, but I was seriously cute). There had to be something sinister going on. Palms must have been greased. The fix had to be in. How was it possible that year after year, all I had was a collection of coins. Then I finally learned the truth. It wasn’t sinister goings on, it was sartorial. Turns out, all that princess taffeta came at a price, a discounted that price when all the dresses were one size. A size, it turns out, that wasn’t mine. In other words, no matter how cute a potential float-sitter, if the dress doesn’t fit, the judge can’t commit.

Why am I reliving this trauma now? After years, nay decades of swearing off pageants, I entered one last weekend. A pie pageant. Sure it was for a charity event with a cause most worthy, but the cash prize for the winner was enticement enough to block out my past taffeta-lessness and Kennedy coin flashbacks. It’s nice to know that in a constantly changing world, some things can be counted on. The sun rises each morning, the moon rises each night, and my pie didn’t fit the dress. Doesn’t matter. It raised about $40 for a great local charity, and tasted better than a bucket of Kennedys. 🙂

imageYes, this is the recipe of the runner up pie, though I prefer to think of it as Caramel Apple Pie. It’s a tasty amalgam of my mom’s pie, my favorite pie crust, and the addition of caramelized apples added out of necessity to use up some pink ladies I had sitting around for a while. This is a tart apple pie, so if you are looking for high sweetness, this dress won’t fit you. 😉

Caramel Apple Pie

Makes one 9-inch pie

For the Caramelized Apples:

  • 3 tablespoons unsalted butter
  • 2 ½ TBSP sugar
  • 1 lb sweet-tart apples (pink lady, honey crisp), peeled, cored, and cut into 1/2-inch cubes
  • 1/3 cup whipping cream

For the pie:

  • 5-6 large granny smith apples (about 2 lbs), peeled and cut into 1/4’’slices
  • 3-4 rounded TBSP of sugar
  • 1 tsp cinnamon
  • Zest of one lemon (about 1 TBSP)
  • 3 TBSP cold butter, cut into about 1/4 ” cubes

Make a double batch of pate brisee according the recipe. Divide the dough into two pieces, making one disk slightly larger than the other. Roll each crust out, one to fit a 9″ pie pan (I use pyrex, but metal pan or foil pan works fine too), and one slightly larger to use as the top. Chill the crust while you prepare the apples.

For the caramelized apples:

Melt butter in large skillet over medium heat; sprinkle sugar over. Stir until sugar begins to melt, about 1 minute. Add apples. Sauté until apples are brown and tender and juices orm, about 10 minutes. Add cream and simmer until sauce thickens slightly, about 2 minutes. Cool 15 minutes before adding to bowl with raw apples.

For the pie:

Preheat oven to 400°F. Peel and core apples, cut into slices ¼” thick slices. Put sliced apples in large bowl, sprinkle with the sugar, cinnamon and lemon zest. Add caramelized apples, toss well and set aside.  Pile the apples into the chilled crust-lined pan and scatter the butter cubes over evenly. Cover with the second crust and crimp the edges. Cut 4 slits around center of top. If you have some extra dough, you can cut out some leaves and place decoratively on crust. Brush top with a little cream and sprinkle with sugar (brush just the center, not the edges.) Put pie on a cookie sheet (it makes it easier to move in and out of the oven and catches any drips). Bake at 400°F for 30 minutes or until crust is lightly browned. Let cool 20 minutes before serving.

If you like what you read here, please help me spread the word. Meantime, I’d love you to join me on Facebook (please click the ‘like’ button), and check out what else is going on in my kitchen at cookinginmyheels.com. Thanks!  🙂