Eating my young

Fifi, Jacques, Pierre, Coquette, et al

Happy Mother’s Day!! Ok, perhaps “Eating my young” isn’t exactly the best title for a post on Mother’s Day, but bear with me. Remember back a month or so ago when I mentioned I’d jumped thumbs-first into gardening? Turns out when you put those seeds from the cute packets into the dirt and water it frequently, (well, fairly frequently – I mean geez, you have to keep that crap up), stuff happens. Crops stuff.

Crops may be a bit of an exaggeration. Let’s just call them crops in training. Specifically, radishes. The cutest little baby radishes you’ve ever seen. I’m not sure they are supposed to be so little, but since putting “baby” in front of vegetables makes them fancier (and a dollar more at the market), I’m going with the premise that I am intentionally growing ultra-chic baby “French” radishes. Why French? I have no idea. I bought the seeds in Lowes in Salt Lake City, about as far from France as you can get. But hell, the sweet little seed pack said they were, and since it was right about that “water frequently” thing, I can go with Fifi and Jacque radishes.

Anyway, after I dug the trench, sprinkled the petites grains de radis over, slapped some dirt on their tiny little tetes (ok, I’m carrying this french thing a little too far), and watered, worried over, covered up when they were cold, told them they is smart, they is kind, they is important, this ←happened. This crap actually works! And as a good mom, I just had to see what was going on under that tousled head of green leafiness.

So I pulled one up. “What little adorable red and white root are YOU! Who’s a good radish. YOU ARE!” Then, I did it. I couldn’t help myself. I ate my baby.

Before you get all judgy on me, think about what you would have done. You raised them to be wonderful. Your job as a parent is to prepare them for life, give them what they need, and let them go. In this case, I let Fifi go into my mouth, providing all the crisp, peppery goodness I raised her to be. Did I feel guilty? Maybe a little.  I got over it by the third one.

Happy Mother’s Day!

I don’t really have a recipe for you this time, just a favorite preparation. Radishes with Sweet Butter and Sea Salt. I’ve been eating radishes on buttered bread with salt and pepper since I was a little girl. My father was “chef”, the radishes from our tiny backyard garden. There’s really not much better. And just in case you think this is too simple to serve to guests, don’t. One of the best restaurants in my old home town (Prune in NYC), features this dish on their menu and has since they opened. Preparation is simple – fresh radishes, washed and left with their greens attached (they make a great handle), good sea salt (Maldon or another flaky one is great for this), good sweet butter (slightly cool but not hard), and a crispy baguette or thick slice of artisan loaf.  Add a latte or chilled glass of rosé and you have the perfect breakfast, lunch, snack or appetizer, and a great way to celebrate Mother’s Day!

If you like what you read here, please help me spread the word. Meantime, I’d love you to join me on Facebook (please click the ‘like’ button), or my Instagram page. Thanks! 🙂


Serendipitous

FullSizeRender - Version 2I love words. You’ve probably figured that out by now. I also love to make up words. No surprise there either. I mean, a fascination with shoes should be called a fashoenation, don’t you think? Then there are the words that sound like I made them up but didn’t. ‘Culinarily’. Definitely sounds like something I’d fake, but it’s legit.  ‘Ersatz’ sounds made up and a little gassy, but it’s real. ‘Fecund’. Not only does it sound made up, it sounds like something you’d haul off and slap someone for calling you. Yet if someone actually described me as “intellectually productive and inventive to a marked degree”, (I had the chance to look it up), I’d likely be flattered. Then I’d slap them for using such a pompous-ass word.

Now take the word ‘serendipitous’. First, it’s fun to say. Five syllables, with ‘dipi’ in the middle. If I was making up a word, I’d definitely put a dipi in it somewhere. The meaning is interesting too, and sums up my life of late. Kinda good (fortuitous), kinda not so good (erratic and uncertain), kinda fluky as in life feels like one big crapshoot. All of that can be said for the word, for me, and probably for just about everyone else too. We can all plan as much as we want, meticulously lay out the course as we’d like to see it, but there’s no guarantee that any of that is going to turn out as prescribed. Fact is, me, you, none of us has a lock on how things are going to turn out. Doesn’t mean we shouldn’t plan, or work really hard, or hope. At least that’s how I look at it. Sure serendipity will always factor in, but I’m serendipitously optimistic that whatever happens, I’ll make the best of it eventually. After all, I’m one fecund gal.

2015-09-25 17.43.12So why all the serendipitous chatter? I had a moment of serendipity when recently contacted by someone who works for Azure Farms. Serendipity, by way of the offer of free stuff to play with. Azure Farms is a local farm that among other things, grows and mills flours. The farm is part of Azure Standard, a food and goods grower/supplier based here in Northwest Oregon that distributes through coops, buying clubs and distributors across the country. As a local baker and blogger, I was asked to try out some of their flours. I chose two of their wheat flours, one hard red, one a softer pastry flour, and I must say both are beautiful products to work with. Organic, local, great quality. Of course, being given bags to play with for free was pretty awesome too. Certainly some new recipes will follow. But what got me really excited was the bag of their garbanzo flour.2015-09-25 13.37.20

If you’ve never used garbanzo (chickpea) flour, you’re in for a treat. You could certainly substitute it for some of the wheat flour in a recipe, especially if you are trying out some gluten free options. However, I chose to make a dish this kind of flour is known for. Socca or Farinata is part flatbread, part pancake, and totally delicious. A street food commonly found in the Provence region of France (socca) and neighboring Liguria, Italy (farina), it is the marriage of golden chick pea flour, lots of olive oil, onions, and whatever herb you like, cooked in a hot oven, brushed with more olive oil and then broiled briefly. I made it as a snack/appetizer to go with a great bottle of wine, but it could easily serve as first course, brunch or lunch. Thank you Rob from Azure Farms for your generosity inspiring this tasty addition to the Cooking in My Heels recipe files!

Socca/Farinata (Adapted from Mark Bittman and the New York Times)

4-6 appetizer servings

Recipe Notes: Bittman’s recipe calls for a 12-inch nonstick pizza pan or skillet. I grabbed a well-seasoned 10-inch cast iron pan to make this, which makes a little bit thicker pancake, and I liked it better than the original. You can use whichever you prefer, just make sure the pan is well-seasoned or nonstick. If using the larger, you’ll have a crispier socca; use the smaller and you’ll get crispy top crust with a softer almost creamy inside. I reduced the pepper a little, and the rosemary too. Both were great at first, but I found you lost the subtle chickpea flavor to the rosemary and pepper.

  • 1 cup chickpea flour
  • 1 cup lukewarm water
  • 1 teaspoon salt
  • 1/2 -3/4  teaspoon freshly ground black pepper
  • 4 tablespoons olive oil, plus 1 more for sautéing the onions
  • ½ large onion, thinly sliced
  • 1-2 teaspoons chopped fresh rosemary or whatever your favorite – thyme or sage would be great too.

You can make the pancake in about 45 minutes start to finish, or make the batter and onions ahead, park it in the fridge for up to 12 hours, and bake it off as you are making cocktails or pouring wine. The instructions below are for prep/bake/serve.

2015-09-25 17.06.35 2015-09-25 17.25.36

Preheat the oven to 450ºF. Heat a nonstick pan or well-seasoned cast-iron skillet over medium heat. Add one tablespoon oil to pan, and once it is hot, add the onions and a pinch of salt. Cook until they are nice and caramelized. While the onions are cooking, mix the chickpea flour, salt and pepper in a bowl. Slowly add 1 cup lukewarm water, whisking to eliminate lumps. Bittman suggests an immersion blender. A whisk is fine, especially if you are planning on letting it sit a few hours, but if you like power tools, have at it. Once the batter is smooth, stir in 2 tablespoons olive oil. Cover and let sit while the oven heats, or for as long as 12 hours.The batter should be about the consistency of heavy cream.

Once the onions are done, remove from pan, wipe out, put 1 tablespoon oil in the pan, and put pan in oven for about 5 minutes until oil is hot. Stir in the rosemary or whatever herb you’re using into the batter, along with the onions. Carefully remove the pan from oven and pour the batter in. Return to oven and bake for 10 to 15 minutes until the pancake is firm and the edges set.

2015-09-25 17.36.33 2015-09-25 17.41.22

Carefully remove the pan from oven and brush with remaining tablespoon of oil. Turn broiler on. Place pan a few inches away from the broiler and cook just long enough to brown it in spots. Cut it into wedges, and serve hot or warm. Leftovers are great cold, or reheated and crisped up in a little oil in a pan.

 If you like what you read here, please help me spread the word. Meantime, I’d love you to join me on Facebook (please click the ‘like’ button), and check out what else is going on in my kitchen at cookinginmyheels.com. Thanks!  

Hacks

DSC02819For this week’s post, I thought I’d share a few culinary hacks. No, I’m not planning on breaking into some super secret, presumably impenetrable cache of Pentagon recipes. The hack I mean is actually a good thing, and if you perfect one you probably won’t have to worry about the NSA tracking you down, or spending any time with Vladimir Putin.

I started to hear about ‘life hacks’ (the good kind) a few months ago. Yeah, I’m a little late to the game, again. So as not to illuminate my cluelessness further, I thought I’d do a little on-line research rather than ask a friendly twenty-something what exactly this thing was. Naturally, I went to the foremost authority on everything (Google), and then to the cyber-cyclopedia (Wiki). Here’s what they had to say, hack-wise (my comments are in parenthesis):

Life hacking refers to any trick, shortcut, skill, or novelty method that increases productivity and efficiency, in all walks of life. (In other words, being clever.) (Here’s my favorite part…)The terms hack, hacking, and hacker have a long history of ambiguity in the computing and geek communities… (I was unaware “computing” and “geek” were two separate communities.)

So in other words, a ‘hack’ is just a clever way to solve a problem. Put another way, when you are missing a thingamajig or too lazy or broke to go out and get the aforementioned whatsis, you come up with a solution with what you’ve got on hand.  Invention, catalyzed by laziness seems to sum it up. Which means I’ve been using hacks all my life. Duct tape is usually involved, unfurled paperclips or bobby pins too.  And on one occasion the cap from a can of hairspray (back when big hair was BIG), and it worked quite well to fix a running toilet. You’ve heard the phrase “the right tool for the job”? I’m more a tool that is right at hand kind of gal.

I’ve repaired squeaky hinges with olive oil cooking spray, piped decorative icing flourishes with plastic baggie, squeezed countless limes with kitchen tongs, and used a vegetable peeler on butter, chocolate, cheese, and even a carrot or spud. I didn’t know we needed a trendy hipster name for it, but since we apparently have one now, it’s safe to say I’ve hacked my way through life.

When I started to think about applying hacks to cooking, I realized about half the dishes I’ve come up with were done so with hacks firmly in place. Hacks seem tailor-made for cooking, since we are constantly trying to come up with substitutions due to allergies, calories, cost, unavailable ingredients or the likes and dislikes of our eaters. Today I’ll share two recipes, one mine, the other from the Saveur. Both take advantage of the abundance of sweet corn this time of year and use it as a cream sauce hack for pasta.

File Aug 30, 2 18 12 PM Fettuccine with Corn Crema and Charred Green Onions 

(Marc Vetri, Saveur 2015)

Serves 8-10

  • 2 tbsp. olive oil
  • 1⁄2 yellow onion, minced
  • 2 large ears corn, shucked and kernels removed
  • Kosher salt and freshly ground black pepper, to taste
  • 2 scallions, trimmed
  • 1 lb. fresh egg yolk dough or pappardelle
  • Ricotta salata, for serving

Heat oil in a 4-qt. saucepan over medium heat; add onion and cook until soft, 3 minutes. Add 1⁄4 cup water and all but 1⁄4 cup corn; simmer until heated through and almost tender, 2-3 minutes. Add salt and pepper and transfer to a blender; purée crema until smooth.

File Aug 30, 2 17 39 PMHeat a 10” cast iron skillet until hot; cook scallions, flipping once, until charred, 2-3 minutes. Transfer scallions to a cutting board and mince. Wipe saucepan clean and add remaining oil; cook reserved corn and the scallions, 1 minute, then add corn crema and cook 1-2 minutes more. Meanwhile, bring a large saucepan of salted water to a boil. Cook pasta until al dente, about 7 minutes. Drain, reserving 1⁄2 cup pasta water; add pasta and reserved water to saucepan and toss to coat. Transfer to a serving platter and grate ricotta salata over the top.

Fresh Pasta with Basil Sweet Corn Sauce

(Me, 2012 or somewhere around there)

Serves 2 as main course, 4 as starter

  • 2 small-medium ear of sweet corn (you’ll need about 1 cup kernels) – still in the husk
  • 8 oz. fresh fettucine (about 6 oz. dry)
  • 1/4 cups fresh basil leaves, plus a little extra for chopping and sprinkling on top
  • 2-3 TBSP fresh goat cheese
  • 1 TBSP butter
  • 2-3 TBSP grated parmesan cheese, plus extra for table
  • Salt & pepper

Wrap the ears of corn, husk and all in a paper towel and steam in the microwave for 3-4 minutes until it is just tender. Once it cools enough so you can handle it, remove the husk and silk (this is a lot easier once it’s been steamed), and cut the kernels off of the cob. You should have about 1 cup total. Set aside 1/4 cup of corn, then put the rest, along with the goat cheese, butter and parmesan in a blender. Tear up the basil and add to blender. Add a pinch of salt and a few good grindings of pepper.

Bring a pot of water to boil for the pasta. Once boiling, salt liberally (the water should taste salty) and stir until the salt dissolves. Remove 2/3 cup of water and add to the blender. Blend until you have a somewhat smooth sauce. You want a little texture. Put the sauce into a skillet and add the reserved corn kernels.

Cook pasta until it is just al dente. About a minute or two before the pasta is ready, turn on the heat under the sauce and bring to a simmer. When the pasta is done, add it to the simmering sauce. Don’t drain the pasta before adding, in case you need a little more water to thin out the sauce.  Toss the pasta well on low heat until it is completely coated in the sauce. Taste for seasonings and adjust if needed. Top with a little chopped basil and extra cheese. Serve in warmed pasta bowls.

 If you like what you read here, please help me spread the word. Meantime, I’d love you to join me on Facebook (please click the ‘like’ button), and check out what else is going on in my kitchen at cookinginmyheels.com. Thanks!  

I have issues…

DSC04158_3They say admitting there’s a problem is the first step. So I’m admitting. I’m admitting BIG TIME. I am…a hoarder and an addict. I can’t help it and I can’t stop. You’re thinking shoes, right? I mean, look at the name I chose for my business and online yammering. But you’d be wrong. Sure, I have a lot of shoes. Actually, I had a lot of shoes a few years ago. When I decided to switch coasts I converted much of my sole assets to road trip cash.

Fine Italian leather isn’t the problem. Tomatoes are. And sometimes peaches….and plums….and figs…and… I could go on, but basically the point is I’m a summertime produce junky. I’ve tried to avert my eyes and drive past the enticement of handwritten “farm stand” signs. I’ve attempted to over-schedule myself on farmers market days, just to avoid dealers. Yet somehow I still find them. Doesn’t matter that I have a counter full at home, or a wallet that’s empty. The minute I spy those crimson or yellow or orange or green orbs of juicy goodness calling saucily from folding tables and wooden crates, I’m a goner.

2015-08-11 16.41.51Of all the farm stand temptations, tomatoes are the worst. Ripe summer tomatoes are the sluts of summer produce. I mean, just look at them. Sitting there all voluptuous, brazenly daring you to come over and give a little squeeze. They have no shame, the licentious love apples. They don’t care if I’m perilously close to overdosing from tomato gluttony, or my last dollar budgeted for such things was spent last week. They practically throw themselves at me, exploiting my want. And I want so bad. Jonesing for a caprese, a BLT, or just a fat slab sprinkled with salt is like breathing to me.

2015-08-15 10.38.07Rehab or intervention is pointless, so don’t even try. The only thing to do is jam as many of them into my mouth in as many ways possible, until the brief season of my mania has passed. So if you see me off in a corner, seeds and juices dribbling down my chin and telltale leaves of basil scattered about, don’t look away. It will be over soon. In the meantime….buddy, can you spare a beefsteak?

A thick BLT. A stylish caprese salad. Just a sprinkle of some great flakey salt. I’ve done them all and love them all. But since I’ve amassed a rather embarrassing mess of ‘maters on my counter, I thought I’d better come up with a few new variations to keep it interesting. My first recipe is a variation of tomato pie, this time with a hash brown crust. Hey Tamaytah Pie is named for my dad, who used the term as a cheeky endearment for his wife and daughter.  It works equally well as a name for this hearty summer pie, and I think he would have loved this dish.

My second recipe Tomato Tarte Tartin is a quick and really easy take on the traditional tart, substituting phyllo dough for puff pastry, and letting the oven do all the work.

2015-08-12 19.17.48Hey Tamaytah Pie

Makes one 8 1/2-inch springform pie

For the Crust:

  • 4 cups frozen hash browns, thawed and squeezed dry (do this well, it helps make a crisp crust.)
  • 1/2 teaspoon salt
  • 1/4 teaspoon pepper
  • 2 tablespoons olive oil

For the Filling:

  • 1 cup whole milk ricotta cheese
  • 1 heaping cup grated sharp cheddar
  • 1 cup sautéed onions (large onion coarsely chopped, 1 T each butter and olive oil, a tiny pinch sugar, fat pinch salt, and a few grinds of pepper)
  • 1 tablespoon pesto
  • 1 pound tomatoes – assorted types and sizes, whatever your favorite
  • 1-2 tablespoons butter
  • 2 tablespoons dry unseasoned breadcrumbs
  • salt and pepper
  • Some grated parmesan for sprinkling on finished pie

2015-08-12 17.33.28 2015-08-12 18.01.14 2015-08-12 17.40.24

Preheat the oven to 425F. Oil an 8 1/2″ springform pan. Once the hash browns are squeezed dry, toss with salt, pepper and olive oil. Add the potato mixture to the springform, covering the bottom evenly. Using a flat bottom measuring cup or glass, press the potatoes into an even layer, and up the sides about 1/2 inch. Bake for about 25 minutes until the edges are light golden brown.

While the crust is baking, cut the tomatoes into thick slices, about 1/2″. Lay them out on a double thickness of paper towels and sprinkle with about a teaspoon salt. Let sit for about 25-30 minutes, or for as long as the crust is baking.

Mix together the cheeses, pesto and sautéed onions. When the crust is browned, turn the oven down to 350F and let the crust cool 5 minutes. Blot the tomatoes with another paper towel. Spread the cheese mixture evenly over the crust, then sprinkle with the breadcrumbs.

2015-08-12 18.18.02 2015-08-12 18.25.54 2015-08-12 18.50.18

Arrange the tomato slices over the top of the pie, covering the surface (you and squish them a little to fit. Sprinkle the top of the pie with a pinch of salt, pepper, and sugar. Dot with 1-2 tablespoons of butter.

Bake at 350F for 25 minutes. Remove the outer edge of the springform, turn oven up to 375F and bake another 20 minutes. Remove pie from oven, sprinkle over a little grated parmesan. Let cool to room temperature and serve.

2015-08-15 15.22.27Easy Tomato Tarte Tartin

This one is more suggestion than exact amounts. I have these ridiculously cute mini springform pans, about 4″ in diameter. They are perfect for individual tartlets, and so the amounts I’m describing are for one of those. I got the pans on Amazon, but no reason you have to run out and get some. This works really well with a bigger pan too, 8.5″ or 10″ or whatever you have. Just adjust the amounts accordingly – about 3x for the 8.5″, 4x for the 10″.

Per 4″ mini tart

  • Handful of cherry tomatoes, or a variety of small tomatoes. You’ll need enough to fit in one layer in the pan, squeezed together a little so there aren’t big spaces in between. A variety of bigger and smaller tomatoes works particularly well here.
  • 1-2 teaspoons olive oil
  • 1 pinch sugar
  • 1 teaspoon honey
  • A pinch salt & a few grind pepper
  • Small splash of balsamic vinegar.
  • 1 tablespoon dry unseasoned bread crumbs
  • 5 sheets phyllo dough, cut to a square about an inch larger than the size of your pan (if you are making a bigger tart, use bigger piece of phyllo, not 3x the number of sheets)
  • 3-4 teaspoons grated parmesan
  • Olive oil spray, or a small dish of olive oil for brushing the dough
  • A few leaves of basil for garnishing

Preheat oven to 400ºF. Toss the tomatoes with the sugar, honey, salt, pepper, oil and balsamic. Generously oil the pan. Lay the tomatoes in the pan, in a single layer, carefully fitting them in so there is little empty space. Sprinkle with the bread crumbs and a little of the parmesan.

Take one sheet of phyllo, spray or brush with oil and sprinkle a little of the parmesan over. Top with next sheet of phyllo and repeat. Keep going until you get to the last sheet. Don’t spray that one yet. Take the stack of prepared phyllo and place on top of the tomatoes, tucking in the edges around the tomatoes. Spray with a little oil.

2015-08-15 14.49.13   2015-08-15 14.55.40 2015-08-15 15.16.43

Since every springform pan I’ve ever met leaks, wrap the pan with a little foil.  Place on a cookie sheet and bake for 20-25 minutes (more time for larger pans.) Check at about 15 minutes, and if the phyllo is getting too dark, cover with a piece of foil.

Remove from oven and carefully remove sides of pan. Invert a plate onto the tart, and slide a spatula under it. Now carefully flip it over, and remove bottom of pan. Do this over a plate or paper towel, since there’s bound to be some liquid. Let cool to room temperature, tear over a few basil leaves and serve.

File Aug 17, 2 03 41 PM[BTW – this technique works really well with fruit too. Just substitute halved small plums for tomatoes, honey and chopped nuts for the oil and cheese on the dough, and swap out the vinegar and salt and pepper, and add in a little more sugar, some cinnamon and butter.]

If you like what you read here, please help me spread the word. Meantime, I’d love you to join me on Facebook (please click the ‘like’ button), and check out what else is going on in my kitchen at cookinginmyheels.com. Thanks!  

Sidekicks

What would Batman be without Robin? Or Lucy without Ethel? If Fred had no Barney there’d be no one to ditch the quarry with for the ballgame, thereby erasing the particular glee a “Fred and Barney Day” brings to thousands of the ersatz sick sitting in afternoon bleacher seats. Yogi without BooBoo makes that pic-a-nic basket unappealing. And I can’t even think about Richie Cunningham without at least Potsie in the picture, or Laverne working the Shotz line Shirley-less. OK, so maybe I did watch a lot of TV as a kid, but you get where I’m going with this, right? The sidekick may get second billing, but a star would be paler without a second banana polishing his shine.

I was recently encouraged to put more of me in my blog. This is me. Me, getting ready to eat, which is pretty much all the time.

I was recently encouraged to put more of me in my blog. This is me,  getting ready to eat, which is pretty much all the time.

Same goes for food. Can you really think of a hamburger without ketchup, a reuben without russian, or a frank without the mustard? (FYI, I’m ignoring the hamburger-mustard crowd on purpose. That stuff’s just wrong. And if you are past the second grade and still putting ketchup on a dog, shame on you. My blog, my rules.) Condiments are the sidekicks of the culinary world. Without them, things just seem unfinished. Sure your sausage may be stellar, that steak sublime, but adding just the right condiment elevates that bite to “F$#K YEAH!!!” You know if food makes you swear it’s gotta be good.

The other day while excavating the archeology of my freezer, I found some boneless chicken breasts and a ribeye tucked away in the back. Yipee! Meat!! (I’m on a tight budget.) Both needed to be eaten before the ice age took its toll, but I was bored with my usual steak sidekick (caramelized onions), and after one too many tequila lime or lemon garlic chicken marinades, needed something to make that chicken interesting. My recipe for Balsamic Onion Jam was amazing with the steak, and this Simple Barbecue Sauce  found in the New York Times was perfect on the chicken (and pretty freakin’ awesome on last night’s burger too!)

Andrew Scrivani for The New York Times

Andrew Scrivani for The New York Times

Simple Barbecue Sauce (John Willoughby, NYT,)

Makes about 1 1/2 cups

If you haven’t already discovered cooking.nytimes.com, I encourage you to take a peek. Lots of great recipes both new and from the considerable archives of the NYT Dining section (think Craig Clairborne and Pierre Franey.) I get daily emails from the site, which is how I discovered John Willoughby’s awesome and fast bbq sauce.

File Jul 22, 5 22 46 PM File Jul 22, 5 22 26 PMThe only ingredient that may not already be in your fridge or pantry is the pimentón (smoked Spanish paprika).  This stuff is really worth seeking out. I have the picante (hot) version and it’s one of my favorite things to add in a bit of smoke and heat to recipes. And since a little goes a long way, a can lasts for a while.

  • ⅔ cup ketchup
  • ½ cup cider vinegar
  • ¼ cup brown sugar
  • 2 teaspoons pimentón (smoked Spanish paprika)
  • 1 teaspoon ground cumin
  • 1 teaspoon kosher salt
  • 1 teaspoon freshly cracked black pepper

Combine all ingredients in a small saucepan, bring to a simmer over medium heat and cook for 5 minutes. Keeps in an airtight jar in the fridge for several weeks.

2015-07-18 13.13.31

Balsamic Onion Jam

Balsamic Onion Jam

Makes about 1 1/2 cups

  • 2 large Walla Walla or other sweet onions (about 4″ in diameter)
  • 1 large red onion (about 4″ in diameter
  • 2 tablespoons olive oil
  • 1/2 cup sugar
  • 3/4 cup balsamic vinegar
  • 1/4 cup ruby port
  • 1 bay leaf
  • 1 sprig rosemary
  • 2 sprigs thyme
  • 1 tablespoon salt
  • 1 teaspoon pepper
  • 1 tablespoon balsamic glaze (available in most supermarkets, and a pretty wonderful condiment all by itself)

2015-07-18 11.56.58Cut the onions into quarters, then into 1/4″ slices. This doesn’t have to be precise. You’re going to be running the finished jam through the food processor for a few pulses when it’s finished cooking.

Heat the olive oil over medium heat in a pan large enough to fit everything. Add in the onions, sugar, salt and pepper and toss so everything is mixed well. Add in the balsamic and port and stir to coat the onions. Nestle in the herbs, turn heat to medium/high and bring to a boil. Once you are at a boil, turn down to medium/low and partially cover so there is about an inch of open pot on one side, and maintain a slow boil. Cook for 45 minutes, stirring every once in a while, until the onions are very soft.

 2015-07-18 12.03.06 2015-07-18 13.04.43

After 45 minutes, remove the cover and fish out the herbs. Add in the tablespoon of balsamic glaze and continue to cook over low heat (maintaining slow boil) until the liquid in pan thickens to where you leave a clean trail when running a spatula along bottom of pan, (about 15 minutes). Remove pan from the heat and let cool about 15 minutes before adding to food processor. Pulse 3 to 4 times — you want to chop just enough to break up any long pieces of onion but not puree. Taste jam for seasoning and add more pepper or salt to taste.

You can use this as a condiment for most meats, and it’s pretty terrific on a cheese board too. The jam keeps for several weeks in an airtight jar in the fridge, but I doubt you’ll have to worry about keeping it that long. 🙂

If you like what you read here, please help me spread the word. Meantime, I’d love you to join me on Facebook (please click the ‘like’ button), and check out what else is going on in my kitchen at cookinginmyheels.com. Thanks!  

THE SKY IS FALLING!!!

snowheadThis past week the east coast was hit with a blizzard. Which, naturally, is portrayed by the various forecasters, meteorologists and sundry other weather people as SNOWPOCOLYPSE!! BLIZZAGHEDDON!! SHOVELPALOOZA!! Stock in Charmin is sky high due to demand outpacing supply. Easterners are forced to buy FULL FAT milk, as shelves are emptied of their precious 1 and 2%! The only cereal left in the aisle is All Bran, because everyone knows natural disasters and MEGA STORMS mean Captain Crunch and Fruit Loops are allowed as a meal substitute.The. End. IS. NEAR!!!!!

Ok CNN and the rest, get a grip. Sure it’s entertaining as hell to see all those broadcast Chicken Littles work themselves into a lather as they get footage of a lone snowflake on mitten (yes, we know each is unique, we too learned that in second grade), and flail arms over computer generated storm track maps.But it’s just snow. Butt-loads in places perhaps, but still just snow. Frozen water. Something that will melt, eventually. Inconvenient? Yes. Messy? You betcha. And isn’t it fun to hunker down in a cozy home with snuggly people, and the treats everyone allows themselves when the frozen stuff pours from the sky. Even the authorities know this. Orders of “shelter in place” translate to ‘stay inside and drink’. Surely that’s what they meant. And if you weren’t one of the hungry hoards standing on line in the markets during pre-snow hours of non-stop TV doom, you knew the unexpected joys of creating meal plans out of what you had in your bunker.

I think Mother Nature throws these meteorological events at us just for this purpose. After all, just how many boxes of the ‘San Francisco Treat’ do you plan on collecting before you die? There’s no contest you know. Add some cheese, a little of that full fat milk instead of water, roll in breadcrumbs and you’ve got the best fried rice balls you can guiltily have without guilt. You know there’s no guilt in a snowstorm, right? It’s a barometric pressure thing. You want pancakes and french toast and eggs and bacon and sausage? Go right ahead. You’ve got to keep up your strength…there’s SNOW out there!

The basic food groups shift too. Again, barometric pressure. And there are more of them. There’s the chocolate group, the butter group (dip is included in this, and cheese, lots of cheese), the wine group (or whiskey, or both), the “carrier” group (pasta, bread, potatoes, chips), and peanut butter. And anything you can bake with eggs, butter, flour and sugar. Incidences of baking seem to increase at the thought of snowflakes. If you’ve got peanut butter you don’t even need the flour. Peanut butter cookies are as easy as sugar, eggs and the Skippy. Gluten free too…see, it’s HEALTH FOOD!

Of course, by dawn’s light and the plow’s third pass, the crisis has passed, CNN turns back to whatever else is going on, and things go back to a slushy slog, and longing for spring’s first buds. So embrace it while it lasts. The shovel can wait ’til tomorrow…

DSC07878I love the opportunity to peruse the pantry and clear out. It’s a nice exercise in the Karin thought process. For example, why exactly do I have 4 cans of cannellini beans. I know why I had one, but apparently I kept thinking I needed more. Same goes for chickpeas. I really like hummus, but I’m one person. I don’t like it enough to warrant 3 cans of garbanzos worth. So with my wealth of beige legumes, and the Superbowl this weekend, I thought I’d try to come up with something that would purge these beauties from my pantry, in a snacky kind of way. Enter Garlicky Cannellini Bean Dip, and Roasted Spiced Chickpeas.

Roasted Spiced Chickpeas

Makes about 1 1/2 cups of chickpeas

This is a ridiculously simple recipe. Which is good, because the key to a snow day is not slaving over the stove, but rather lying around, eating, drinking, and generally saving up your strength to face the elements at some point. It’s also totally up to you what spices you add. Like curry instead of cumin? Go ahead. Want them a little sweet rather than savory? More cinnamon and a little pinch clove. Hotter? Have at it. You get the idea…

  • 2 cans chickpeas, drained and rinsed
  • 1 1/2-2TBSP olive oil
  • 1-1 1/2 tsp salt, depending on taste (I used sea salt, which is a bigger flake, so if you use regular table salt, you may want to cut back a bit.)
  • 1/2 tsp pepper
  • 1/2 tsp chili powder
  • 1/2 tsp cumin
  • 1/4 tsp cinnamon
  • 1/4 – 1/2 tsp smoked hot paprika (or cayenne or whatever spicy mix you like)

Preheat over to 375F. Drain, rinse and dry the chickpeas. I put them on a paper towel lined  sheet pan, then rub them with another paper towel. Some of the skins will probably come off, that’s fine. Just pick the skins out (they have a tendency to burn).

In a bowl, add the olive oil, salt, pepper and spices of choice. Whisk to combine. Toss in the now dry chickpeas and toss so they are all coated. Taste a chickpea and adjust seasoning if needed. Just don’t over salt. These shrivel up a little so a bit under salted is fine. You can always sprinkle a little more over at the end.

Pour out the seasoned chickpeas onto a foil-lined baking sheet, and arrange so they are all in one layer and spread out a bit. Roast for 40 minutes, shaking the pan a few times during roasting. Taste one and decide if you want them just crispy on the outside and creamy inside, or crunchy through. If you want crunchy, continue roasting for another 10-15 minutes, keeping an eye on them so they don’t burn.

Cool and serve. These are best the day you make them. Calories: approximately 125 per 1/4 cup.

Garlicky White Bean Dip

DSC06069 - Version 2

Garlicky Cannellini Bean Dip

If you like what you read here, please help me spread the word. Meantime, I’d love you to join me on Facebook (please click the ‘like’ button), and check out what else is going on in my kitchen at cookinginmyheels.com. Thanks!  🙂


The Unresolved

©cookinginmyheels.com

©cookinginmyheels.com

I’ve mentioned more than once (usually this time of year) that I hate New Year’s resolutions. Considering the sheer number of them cast on calendar day 1, the odds that they are actually fulfilled is slim, meaning you start off the fresh slate of a new year with failure. I know this from experience. Therefore for a few years now I’ve planted myself firmly in the unresolved category. Nope, no stinkin’ perky overly optimistic New Year resolutions for me.

Yet, in the interest of full disclosure, I have to admit there are a few things I’d like to change now that 2014 is behind and 2015 all bright, shiny and new. Specifically, my 2014 behind, and sundry other jiggly bits that seem to be spilling over. In other words, just like all the other folks tipping scales a bit too much to the right, I’m going on a “diet”.

Yes, I know it’s not “in” to use that word anymore. It’s a “lifestyle change”, or “correct choices” or “taking control of your life”. At least that’s what the countless commercials that seem to start the minute the clock strikes twelve on January 1st say. The only thing running more than enticements to join Jenny, or watchers, or Marie’s microwaveable boxes are dating site ads (Farmers Only dotcom… Seriously!) Obviously Madison Ave is sure the key to New Year happiness is skinny jeans and a date (and maybe Ol’ MacDonald.)

Whatever it’s called, the point is there’s more of me than space in my jeans, and if I want to feel better about my reflection, I’d better do something about it. So I have. At any other time of the year, this would not be considered a resolution, therefore I am resolute to be unresolved. I’ve just started my March diet a little early. 🙂

h8RkHMLfK9o3yaad7dsP8hsw1m4ROmk7GLkArJpzmYY[1]Resolution Enchiladas

Makes 8 enchiladas, or 4 servings

This is my go-to enchilada technique for two reasons — it’s adaptable to whatever I have on hand, and it’s quick. That means when I’m trying to cut calories but still have something filling and tasty, it’s a perfect fit. When I’m not counting, full fat cheese and chorizo. When I am, lower fat cheese, spinach and black beans. Simple, satisfying, and very tasty. This recipe also features a favorite appliance when I’m hungry and want something NOW…my can opener.

N_tfiPpDSTVO8xK5P8ExE-1t4it2iOj9mlacIz1ft6E[1]Ingredients:

  • 1 cup drained canned black beans
  • 1 1/2 cups frozen chopped spinach, thawed and squeezed dry
  • 1 TBSP chopped cilantro (leave out if you are one of those who HATE cilantro)
  • A tablespoon or two ( or toss in the whole can) fire roasted chopped green chilies, depending on your tolerance of heat – could substitute chipotles in adobo here too.
  • 1 1/2 cups shredded cheese – (I used a lite mix of cheddar, jack and queso blanco. Go full fat if you like- just don’t go fat-free, it doesn’t melt well.)
  • 1 16 oz. jar of enchilada sauce (try Frontera if you can find it – it’s swell!)
  • 8 corn tortillas
  • 1/2 tsp salt
  • 1/4 tsp pepper

Preheat oven to 400F. Pour about 1/4 cup of the enchilada sauce in a casserole or au gratin dish and swirl around so it coats the bottom. Take your tortillas, wrap them in foil and pop in the oven to warm up for a few minutes and get a little more pliable. (You can also do this in the microwave, wrapped in a damp paper towel and nuked for about 30 seconds.)

Add the beans to a medium-sized mixing bowl. Mash them up a little with a fork (you don’t want a paste, just some squished and some whole beans.) Add the squeezed-dry spinach, chilies, cilantro, salt and pepper and mix well. Toss in half the cheese and mix well. Taste the mix and adjust salt and pepper if needed.

When your tortillas have softened up, lay one tortilla on your work surface and put about a 1/4 cup worth of filling in a line down the center. Roll up and place, seam side down in the casserole dish. Continue with the rest of the tortillas and filling. Pour the rest of the enchilada sauce over the rolled tortillas. An edge sticking out is fine (I like a little bit of crunch) but the enchiladas should be mostly cover with the sauce. Sprinkle over the remaining cheese.

Bake in oven covered for about 15 minutes, then uncovered another 5 until the cheese is melted and sauce is bubbly. Wait about 5 minutes before serving. I like to serve with some chopped avocado, limes, cilantro and low-fat sour cream on the side. Calories: approximately 170 per enchilada.

If you like what you read here, please help me spread the word. Meantime, I’d love you to join me on Facebook (please click the ‘like’ button), and check out what else is going on in my kitchen at cookinginmyheels.com. Thanks!  🙂


Hoppy Hour

©cooking in my heels

©cooking in my heels

If you’ve been following along for a while, you know my grandmother has gotten a lot of ink on these cyberpages. To me she was Oma, but to those not swimming in her gene pool, she was Betty, or more likely Tante Betty. Tante Betty fully believed in giving back to the community. As long as the community understood that Tante Betty was in charge. Meaning that if in the course of her volunteerism she felt something wasn’t being run well, she would run it. Think of her as a female version of the Desert Fox –her kids did. The organization she was most intimately involved with was an assisted living facility we called the ‘Altenheim’ (or Old Folks Home). Actually, both my grandparents were involved with the Altenheim. My grandfather sat on its Board of Directors, and Tante Betty sat at one time or another on pretty much every other committee there was. When it came to any major holiday party, celebration, or whatever, her potato salad was likely on the buffet, and she was there organizing and telling people what to do, whether they wanted her to or not. The most consistent group she “managed” was the resident’s weekly hobby-hour, or as her German accent pronounced it, “Hoppy Hour”. The purpose of Hoppy Hour was not as you might assume, time set aside to fine tune your favorite hobby-esque activity. This hour of leisure craft had a very specific purpose –to create something wonderful that could be sold at the annual fundraising “Bat-Zaar” (think bazaar, but with teutonic accent.) Residents would gather Friday afternoons and Betty would set them to whatever task was scheduled that week. Countless crocheted potholders, a plethora of plastic mesh embroidered bookmarks, and baskets of felt holiday ornaments were churned out in the form of weekly hoppy hour product. It was Tante Betty’s benevolent factory. And if you didn’t do it correctly? Well, she would make sure you did, or redo it herself. All in the name of hoppy hour happiness. Martha Stewart had nothing on Tante Betty! Why exactly am I relating all of this? It seems I have become my grandmother. Or to be precise, I have become Hoppy Hour. Once a month in the upstairs kitchen/party room of a lovely assisted living facility in my town, Tante’ Betty’s granddaughter teaches cooking class for an hour or so. A subset of residents, all Tantes in their own right, are my most enthusiastic students, and everyone (especially me) has a pretty great time. The only difference is, instead of adding valuable merchandise to the annual bat-zaar bin, we eat our projects at the end of class. I have a feeling Tante Betty would be just fine with that too. IMG_6891 This past week my lovely students at Hawk’s Ridge were treated to a dish that took advantage of the wealth of tomatoes and basil available at the end of the summer.  To say this Roasted Cherry Tomato Tart is easy is understating it. Thaw out some store-bought puff pastry, grate some cheese, and toss halved cherry tomatoes in your favorite vinaigrette and you are pretty much there. A little thyme before it goes in the oven, a little basil after it comes out. That’s all there is to it, except for a glass of chilled white and a plate. Now that’s my kind of Hoppy! photoRoasted Cherry Tomato Tart with Puff Pastry Crust Makes 1 10″ round or 11″x8″ rectangle Serves 6-8

  • 1 sheet frozen puff pastry, thawed
  • 1-1/2 to 2 pints small cherry tomatoes
  • 2 sprigs fresh thyme
  • 3-4 leaves fresh basil
  • 1/2 tsp salt and 1/4 tsp black pepper, plus more for sprinkling on tart
  • 1/2 tsp honey
  • 2-3 TBSP balsamic vinaigrette (homemade or your favorite brand)
  • 1/2 cup grated fontina cheese
  • 1/2 cup grated parmesan, romano, asiago, or a combination

Preheat oven to 400F. Unfold the thawed puff pastry and roll out a little so it fits into your tart pan with a little overlap up the sides. Trim the overlap, and with a fork, dock or poke just the bottom of the dough all over. This will prevent the bottom from puffing. Chill in refrigerator until you are ready. Halve the cherry tomatoes and toss in a medium bowl with salt, pepper, and vinaigrette. Take the crust out of the fridge and sprinkle over the cheese evenly over the bottom. Lay the cherry tomatoes, cut side up, over the tart in rows. Sprinkle over the leaves from two sprigs of thyme. Sprinkle a pinch of salt and pepper over tart, and drizzle the honey. Bake for 30 – 40 minutes or until edges are golden brown and the tomatoes have wilted and are bubbling, rotating tart halfway through baking time. Let cool 5 minutes. Stack the basil leaves, roll together and cut in thin slices. Sprinkle over tart. Serve warm.

2014-09-08 16.38.28

You can make individual tartlets by cutting a sheet of puff pastry into 4 squares or circles, and score the dough 1/2″ from the edges to create a puffed crust.

If you like what you read here, please help me spread the word. Meantime, I’d love you to join me on Facebook (please click the ‘like’ button), and check out what else is going on in my kitchen at cookinginmyheels.com Thanks! 🙂

The Crostata Chronicles

We now return to our continuing story of crostata creation….

I’ve been focusing on these ridiculously easy and adaptable morsels of buttery crust wonderfulness a lot lately, and I offer up no apologies. Nope, not a one. Let’s face it, there isn’t much better in this world than a swell piece of pie. Maybe chocolate….and bacon…and wine… OK, so there’s a lot of good stuff out there, but pie of any shape and in any language is still pretty high up on the swell meter. So, in our continuing saga of crostata (nee galette, nee pie) variations, I offer up the following three, which are sitting on my counter right now just waiting for us to dig in.

[For specific bake times, dough and frangipane recipes, check out last week’s post]

photo 3Peach, Blueberry Frangipane: To last week’s blueberry frangipane variation, instead of all blueberries, do just a border, and then a circle of thin cut ripe peach in the center. Sprinkle the peach slices with about a teaspoon of sugar. Fold edges over, brush with cream, a sprinkle of sugar and bake.


photo 5Cherry Rhubarb: Instead of all rhubarb slices, do a border of pitted and halved black cherries, on a bed of ground almonds with a 1/2 teaspoon of tapioca and some strawberry rhubarb jam (or strawberry jam if that’s all you have). Generously sprinkle fruit with turbinado sugar, fold,

photo 4Cherry, Goat Cheese and Herbed Walnut: I use semolina crust for this one. Chop some walnuts together with a mix of herbs (I used basil, flat leaf parsley, and thyme). Put a layer of herbed nuts on the crust, then sprinkle some goat cheese on top. Add a layer of pitted halved cherries and top with some more herbed chopped walnuts. Fold edges, brush with egg wash, sprinkle a little salt and pepper on the crust, and bake.

My mom has been visiting me in OR for the past week, and her one request in the “what to do while visiting in OR” was to learn how to make pate brisee. The culinary karmic circle has gone a full 360. She took this video on how to fold the crust. The Ed Sullivanesque plate-spinning music is optional…

If you like what you read here, please help me spread the word. Meantime, I’d love you to join me on Facebook (please click the ‘like’ button), and check out what else is going on in my kitchen at cookinginmyheels.com Thanks! 🙂


Like Darwin’s Finches

©cookinginmyheels.com

©cookinginmyheels.com

I’m sitting here in one of the local coffee shops (of which there are several….from my window perch I can view another three over a two block span,) fascinated by a beetle walking up the window. Ok, some of you are doubtless thinking “she’s sitting in a restaurant watching a bug walk by and is NOT; 1. Shrieking and waving something squish-ready at said bug, or B.  Alerting the authorities of A BUG!  Nope, I’m not, for two reasons: first, the bug is more of the interesting than icky variety (and as an ex-biologist, I have a higher ‘ick’ tolerance than most); second, the bug has provided an interesting example for today’s blog musings. (NOTE: I feel it necessary to let you know that as I typed the above, the beetle in question began to join me on my table, and didn’t seem at all phased that I dispatched him back to his window with a gentle flick.)

The point of all this entomology? As this critter was wandering up the window, he fell off. Being determined, he began his upward journey again. And again. And, again. These Sisyphean efforts aside, what was interesting was every time the guy fell, he landed on his feet. No lying on back all legs-a-wiggle helplessness. Just dogged persistence. Seems Ringo (I’ve named him that, for obvious reasons) and his folk have adapted to a shape that always lands on its feet. Dripping metaphor aside, I kind of hope I’m the same way. Actually, I’m counting on it, or to stick with the buggy theme, squishing is inevitable.

A year ago, it wouldn’t have been out of the ordinary to look into a coffee shop window on a Sunday and see me tapping away at my keyboard. Of course, my view back then was considerably different from today. The volume of everything was much greater. The people, sound, vehicles, everything multiplied at least tenfold. And it’s likely I’d have barely noticed. However, take that same keyboard-tapping gal and plop her down into small town Pacific Northwest, and I notice everything. Admittedly, it was a little jarring at first. The lack of noise made every sound louder. Lessen the number of feet on pavement and every foot is more noticeable. The types and varieties of gear, or coffee, or wine and beer — ridiculously plentiful and totally overwhelming. And Subarus. The only thing comparable in NYC to seeing so many of one type of car in so few square miles is the taxi line in front of the Garden after a Knicks game.

But like Darwin’s finches, one adapts over time. I find “awesome” coming out of my mouth more and more. Polar fleece usage is definitely up, I know what a growler is, and I’ve stopped running outside to take pictures of rainbows every time I see one, (only running out every third time now…) And hopefully, somewhere along the way, I’ve started to land on my feet too.

photo 1OK, so I know I’m pretty good at assimilating into a new landscape, there is one thing I will never adapt to…the local pizza. While I give points to a sincere effort in certain venues, for a decent back-home slice my search has turned up nada. I admit I’m a pizza snob, but anyone who grew up in the NY metro area would be. And even though they do so many things really well here,  pizza (and bagels) isn’t among them, so I thought it high time to take matters into my own hands.

Homemade pizza can seem daunting (there’s yeast involved), but it really isn’t all that difficult, especially if you find a good recipe. And what you put on it is entirely subjective to the dough thrower’s taste. I knew there was no knead (sorry) to reinvent the wheel here, so what I’ve done is take my favorite dough recipe (from Stanley Tucci) and my favorite sauce recipe (a combination of Lidia Bastianich’s and Jim Lahey’s), and adapt both to what I like. The dough recipe below is enough for two 12” round pies, or one round and one 9×13” rectangle. This dough freezes really well, and as far as the toppings, I’ve given you the basic margherita pie. Think of it as a jumping off point and evolve away!

Pizza (Without the Box)

This is the basic Margherita Pizza – in other words, just sauce and cheese. However, that doesn’t mean you can load it up with other stuff on top. Just remember one basic rule – less is more. Too much on top and it’s likely all that goodness will land on your lap when you pick up a slice.

Pizza Dough (From The Tucci Cookbook by Stanley Tucci, 2012)

Makes enough dough for 2 12” round or 9×13” rectangle pies

This is Stanley Tucci’s grandmother Tropiano’s pizza dough recipe, which is one of the reasons I love it. The other is it’s a terrific and very reliable basic dough. I did this all by hand just like grandma, but you could just as easily do it in a standing mixer with dough hook attachment.

  • 1 package dry yeast
  • 2 cups warm water (you may not need it all)
  • 4 cups all-purpose flour
  • 1 TBSP kosher salt
  • 2-3 TBSP cornmeal (fine ground is best)
  • 2 TBSP olive oil

In a measuring cup combine the yeast with ½ cup of the warm water. Stir until yeast dissolves.

In a large bowl (or bowl of mixer), combine the flour and salt. Make a well in the center and add the yeast mixture. Begin by mixing with a fork and then by hand while adding enough of the remaining 1 ½ cups water to form a soft, dry dough. *  (*Don’t add in all the water at once. Add half, and then more as you are mixing.)

Turn the dough out onto a lightly floured surface and continue mixing it with your hands. Knead to form smooth dough, adding more flour as necessary to keep the dough from being too sticky. Form into a ball and place in a clean bowl. Cover the bowl loosely with a clean dishtowel and set aside in a warm, draft-free place to rise until doubled – about 2 hours.

When the dough is risen, preheat oven to 500°F.

Divide the risen dough in half. (If you wanted to freeze half, wrap well in oiled cling wrap, then put in freezer bag.) Roll one half of the dough on a lightly floured surface into a round or rectangle (depending on what pan you have.)  Sprinkle the pan with a tablespoon of the cornmeal, then transfer dough to baking sheet.
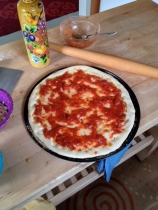
photo 2

The Sauce:

Some folks like to use a cooked sauce for pizza, but since the sauce is going to cook on the pizza, I prefer to do a simple raw sauce for the best tomato punch. You could substitute the same amount of your favorite basic sauce if you prefer.

  • 1 14-ounce can diced tomatoes (use the best ones you can find – there isn’t much to the sauce but really good tomatoes, salt and olive oil. And if good fresh tomatoes are available, use those!)
  • ¼ tsp salt
  • ½ tsp olive oil, plus 1-2 TBSP more for drizzling 

Drain the tomatoes, saving the juices. For each pie, measure out 1/3 cup drained tomatoes and 3 tbsp juice (you want a total of 5 oz.). Add 1/8 tsp salt and ¼ tsp olive oil. Stir and set aside.

The Cheese: (per pizza)photo 3

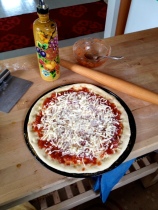
  • 2 ½ ounces shredded mozzarella (I love a combination of 2 oz. mozzarella or fontina, and a ½ oz. gruyere)
  • 1 TBSP grated pecorino romano  

Putting it all together: 

The biggest mistake when making homemade pizza is too much sauce on the dough. It gets soggy and bottom doesn’t crisp nicely, or gets way too heavy and molten sauce and cheese slide off and onto your lap when you pick up a slice. That’s why only 5 ounces of the tomato mixture is all you need. You’ll also notice I don’t use any oregano or garlic. That doesn’t mean you can’t. If you want to add both, just sprinkle a pinch of oregano over the sauce, and as much minced garlic as you like before adding the cheese.

For each pie: 

Drizzle the dough with 1 TBSP of olive oil. Spread the 5 oz. of sauce on the dough, leaving an inch all around the edges. Sprinkle the mozzarella on top, then the romano.

photo 4
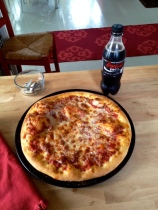
Bake until the edges and bottom are lightly browned, about 12-15 minutes depending on your oven. Let sit 5 minutes before cutting and serving.  And for an authentic NY slice, have extra romano cheese and dried red pepper flakes on the side for sprinkling on top. Calories: about 200 per slice, based on 6 slices per pie.

If you like what you read here, please help me spread the word. Meantime, I’d love you to join me on Facebook (please click the ‘like’ button), and check out what else is going on in my kitchen at cookinginmyheels.com. Thanks! 🙂